Travel Photography: Organizing Images
This week’s travel photography article is about not getting overwhelmed of taking care of thousands of images you have shot with your digital camera.
As always, the Travel Photography article has two sections. The first part is about keeping the photographs organized, such that you can easily access what you are looking for. The second part contains an image review. If you would like to have your images reviewed to know what worked well and how it could have been improved, choose some of your best images and post them on group pool of India Travel and Photography. Don’t forget to tag them as itpcritique, so they can be chosen for review. You can also post your questions related to photography as a comment to this post, or in India Travel and Photography group discussion. I will answer them in next week’s article.
ORGANIZING IMAGES
Organizing photos was never a big deal in the days of film. You would shoot just a handful of pictures in a whole year. And when a film roll is complete, give it to a neighbourhood studio which would process it, print it and put it in an album for you. Nothing else needed to be done. Since the time the world has gone digital, we have been shooting so much that there is a deluge of photographs churned out from the camera. An active photographer may end up shooting tens of thousands of images in a year. Managing them becomes a big a job. Here is how I try to keep my photographs organized.
Delete Unwanted Photographs. This is something we always postpone. Very often, more than half the pictures we shoot are junk. There will be images that are shaken, blown out, completely dark, undecipherable pictures, or things that you don’t intend to keep ever but have shot for the heck of taking a picture. When we save it to the computer, they all get stored along with the good ones until the day comes we start complaining about lack of space in the hard drive.
When you know that you have unwanted images, delete as many pictures as possible in the camera itself. Quickly go through the photos after you download them, and again delete anything you don’t require. It leaves a lot less number of images to manage.
Organize them in folders. It is important to put the photographs in some order. If you download images to desktop or to a temporary folder and hope to put them together sometime later, it is never likely to happen. You will move it out of desktop to some other unknown place, and eventually forget about the location. After some time, you have a dozen different places where your photos are stored. It will only result in having to search hard later when you need those images.
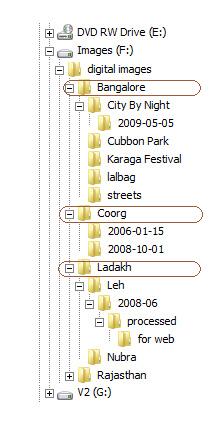
I use the hierarchy of folders to store my photographs, as shown in the picture below.

- Level 1 and 2. Since the volume of pictures I shoot is high, I have partitioned the hard disk and have dedicated a drive only for storing images (The drive ‘Images (F:)’ in the picture). If you are just getting started with a new computer and expecting to store a lot of images, it would be a good idea to dedicate a drive for pictures (plus perhaps videos). If not, you could simply create a folder where all the images are stored (folder ‘digital images’).
- Level 3 and 4. Located under ‘digital images’ folder are all my photographs. I further divide the photos into folders based on locations or events. In the picture above, the folders ‘Bangalore’, ‘Coorg’ and ‘Ladakh’ fall into this category. It could also be events, such as ‘marriage in family’, ‘Ugadi celebrations’, etc. If I have too many images from a location such as Bangalore or Ladakh, I divide them further into subcategories such as ‘City by Night’ under Bangalore, or ‘Leh’ under ‘Ladakh’.
- Leve 5. I don’t store the images directly under the category of locations or events. It can very much happen that I return the same location again and again. As you can see in the picture above, I have made two visits to Coorg. It is likely that the first set of pictures are entirely different from second – I would have experienced and shot different things, and would have gone with different people. So I prefer to keep images from each visit apart.
- Level 6 and 7. Under the date folder is where my RAW images go for the given location. Within the date folder, you see another folder called ‘processed’. This is where all the processed jpeg images get stored. If you don’t shoot raw or don’t process your images, you can do without this additional level.
- Level 8. Here, I store small size images for posting on the web. From the ‘processed’ folder, I downsize the photos to smaller sizes such as 640×480, 500×375, etc. They often get re-used for uploading in various websites (such as paintedstork.com, flickr, facebook, etc), so I keep them at one place instead of discarding them after uploading.
With this arrangement, it is easy for me to find any picture that I am looking for. If I need an image from my 2006 visit to Coorg, I know exactly where to find it. Instead of fumbling through haphazardly located folders all over the computer, I usually know where is the image that I am looking for, and manage to get hold of it in less than a minute.
Tagging and Rating. This would be useful for people who have hundreds of thousands of images and find it hard to manage even with organized folders. Software like Picasa (and many other such solutions) discover all the images in your computer and let you keyword them and rate them. It may help you get hold of the precise image you are looking for in no time. The only problem is, it also takes some some additional time and effort, which would be worth it only if you have very large volumes of pictures.
Backing Up. Backing up the photos is a wise thing to do if you value your photographs. It insures your photos against possible computer crash, virus attack, physical damage and theft. I use an external hard-drive to keep a copy of all my photographs, and synchronize them once a month or so. You can also opt to burn photos into DVDs and stack them away.
IMAGE REVIEW
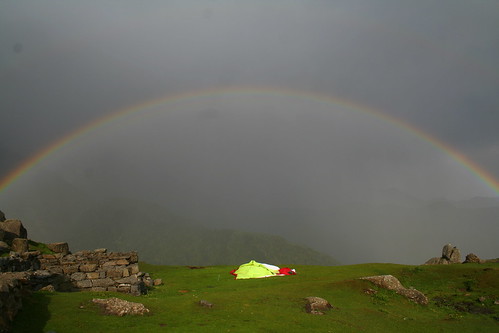
The image below is posted for review by flickr user mridula
It is a photography that easily makes me envious, and makes me want to be there. The location looks great and the rainbow is beautiful. The framing of the rainbow, with a fading mountain in the background and the tent in the middle gives a clear idea of being out somewhere in a remote location on a nice day. The pictures would have looked much better if the tent was kept erected. A few more combinations or framing ideas could enhance the picture: it could be a lone tree or a big rock in the foreground, or someone standing/sitting at the edge and staring at the rainbow. There is sensor dust popping up in many parts of the frame. The camera sensor can do with cleaning, but the dust in this picture can be removed using photoshop.
If you would like to have your images reviewed to know what worked well and how it could have been improved, choose some of your best images, post them on group pool of India Travel and Photography and tag them as itpcritique. Only tagged images are taken for reviewing. You can also post your questions related to photography as a comment to this post or in India Travel and Photography group discussion. I will answer them in next week’s article.
