The weekly travel photography section is back again, after a short two-week gap. Read all earlier articles in the series here.
As always, the Travel Photography article has two sections. The first part of today’s article is about protecting your camera in the monsoon season. The second part contains an image review. If you would like to have your images reviewed to know what worked well and how it could have been improved, choose some of your best images and post them on group pool of India Travel and Photography. Don’t forget to tag them as itpcritique, so they can be chosen for review. You can also post your questions related to photography as a comment to this post, or in India Travel and Photography group discussion. I will answer them in next week’s article.
In my earlier post on Photographing The Monsoon, Shrinidhi left a comment saying, “pls add some tips on how to protect the camera in rainy season- My fear that camera may get damaged due to water entry forces me not to take out the camera if it is likely to rain.” I would have liked to treat it as a Q&A at the end of an article, but the topic was worth a separate post in itself. Here it goes.
PROTECTING YOUR CAMERA FROM RAIN
Fungus. One of the biggest problem that haunts camera lenses is not caused by the rain itself, but the damp weather. If you keep the cameras and lenses packed away in the closet and wait for the monsoon season to end, you may be surprised to see fungus growing inside the lens. Fungus in the lenses is usually a grey fibrous material that slowly spreads in the inner surface of the lens. It grows in moist weather when the lens is stored for prolonged duration without exposure to light. The simple solution to keep fungus away is to keep using the camera often, instead of tucking it away in a closet during the monsoons.
If you do happen to notice fungus growing in the lens, do not panic. A little bit of it doesn’t make a significant difference to image quality. If you explore the lens to light frequently, the growth of existing fungus will be stunted. If it hasn’t spread too much, fungus may even shrink a bit on continuous exposure to light. But if there is a lot of fungus on the lens surface, it may be time to take the lens to a service center.
Using camera in the rains. I would not go ahead and ask you to expose your cameras freely to the rain, but at the same time, there isn’t a need to worry too much about precipitation. Most cameras are robust enough to let you shoot for a short while in a drizzle. But when you do that, ensure that you wipe the camera free of all the raindrops when you are done shooting. Do not let the water droplets linger on the surface. Don’t stay in the rain for long enough to get the camera completely wet. If you do, water could seep deeper into the body. Avoid exposing the camera in heavy rains. In case you get into a situation where the camera is accidentally prolonged to rains for a long time (or has fallen into water), remove the battery immediately and leave the camera for drying in a warm place. If you are lucky, your camera may function properly again.
Plastic bags. If you are going for long walks or treks in rainy days and intend to carry the camera with you, wrap it in multiple layers of plastic bags, or in a ziplock bag. It can keep your camera safe even if you are getting yourself wet in the rain. That way, when you reach a beautiful location and if the rains have subsided, your camera is dry and ready to work for you.
IMAGE REVIEW
The image below is posted for review by flickr user Guzman Sanchez
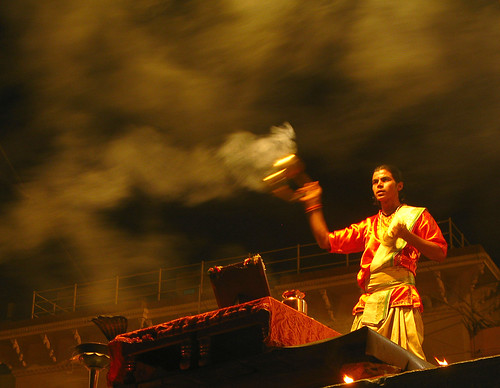
I am struggling to find areas for improvement in this image. There aren’t many I can think of. The positioning of the performer at the right side corner, with smoke moving towards the left works very well in the photograph. Despite being shot at a very low shutter speed(1/5 sec), the image seems to be sharp. The blurred hands are effective in showing motion. The streak of smoke on the top adds well to the image too. The image conveys the overall atmosphere very effectively.
This week’s Travel Photography article is written by Anoop. Anoop blogs about his experiments in photography on Me and My Camera Obscura. I am a fan of his images of birds in action in Mysore’s Karanji Kere. Today’s article is about a filter commonly used along with SLR cameras – Circular Polarizer. Circular Polarizers can help enhance outdoor images taken in sunny days and are also useful in eliminating reflections.
As always, the second part of this article has weekly image reviews. If you would like to have your images reviewed to know what worked well and how it could have been improved, choose some of your best images and post them on group pool of India Travel and Photography. Don’t forget to tag them as itpcritique, so they can be chosen for review. You can also post your questions related to photography as a comment to this post, or in India Travel and Photography group discussion. I will answer them in next week’s article.
CIRCULAR POLARIZER by Anoop
‘Circular Polarizer is a must for daylight outdoor photography’ – this is probably the only line I would write if I had to write just one line about them!
Circular Polarizers are filters mainly used in photographic situations involving reflections. These filters consist of two rings. The inner ring screws on to the front thread of a lens and the outer ring is freely rotatable.
Though I have my circular polarizer always screwed onto my 18-55mm lens, there are circumstances where I have had to use my camera without them. In such cases the thumb rule I follow is ‘If there is enough light for shooting photos without bothering about camera shake, leave the polarizer on the lens.’
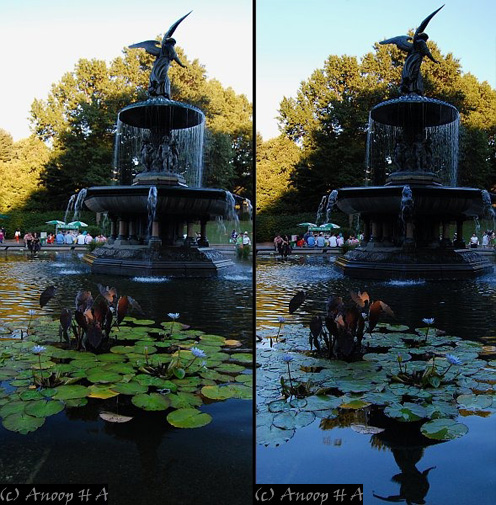
Photo taken at Central Park New York City
Both the above photos are taken with a Circular Polarizer on, and are good examples for the two different extremes of polarization. The only change between the two images is the alignment of the circular polarizer.
The photo on the left almost completely eliminates reflections from the horizontal plane (water). Here we can see the increase in contrast of the water lilies, but on the other hand we can observe that the sky is captured as it really appears.
The photo on the right does exactly the opposite, the reflections are left alone and the direct light from the sky is filtered as a result of which we can see a bluer sky.
Both the photos above are taken with the same camera settings and with the Polarizer mounted; the difference was just in the alignment of the filter’s outer ring. Rotating the outer ring controls the plane of polarization and lets in the light selectively.
Mounting the polarizer normally increases the contrast of the photographed object, as it almost always eliminate some percentage of reflections and reduces glare, and hence bringing out true colors of the object. Being so used to shooting with the polarizer on, I would consider it a sacrilege shooting in following conditions.
- photos having a lot of sky
- photos having reflections of water
- bright outdoor photography
There is one limitation I have encountered frequently while using a Polarizer – the Polarizer does reduce the amount of light coming into through the lens. While this is a hindrance in low light scenarios, it’s not a hassle for daylight outdoor photography.
Note from Arun. If you can see the example images, there is some compromise in either of the pictures. While the first one has a dull sky, the second one lacks the contrast and rich colors of the leaves on the water. Circular Polarizer has definitely helped get the best of the situation. But it can be further improved, if one can devote time and has patience to wait for a day with better lighting. Shooting in the morning or evening on a day when the sky is naturally blue would give the best result without any compromises. Patience has a lot of value in photography!
IMAGE REVIEW
The image below is posted for review by LeFlic17
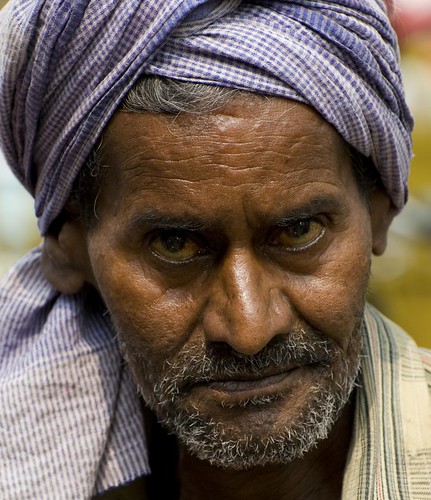
Technically, I can’t find much fault in this image. The image is sharp and in focus. It is exposed properly, and eyes are not in shade as it often happens in outdoor images. It is framed well too, emphasizing the face properly and not having any distractions. But it seems more like a posed shot to me, void of any natural expressions. The man appears conscious of him being photographed. His face is stiff and has lost all the candidness. The picture would have had a lot more life, if some time was given to get him used to the camera, or if the image was made without keeping him aware. For more about this, read the earlier article in the travel photography series: dilemma of asking permission before taking pictures of people.
If you would like to have your images reviewed to know what worked well and how it could have been improved, choose some of your best images, post them on group pool of India Travel and Photography and tag them as itpcritique. Only tagged images are taken for reviewing. You can also post your questions related to photography as a comment to this post or in India Travel and Photography group discussion. I will answer them in next week’s article.
Monsoons have just hit the southern parts of the country. Let’s look at ways to make best use of the cloudy and rainy days in this week’s Travel Photography column.
As always, the second part of this article has weekly image reviews. If you would like to have your images reviewed to know what worked well and how it could have been improved, choose some of your best images and post them on group pool of India Travel and Photography. Don’t forget to tag them as itpcritique, so they can be chosen for review. You can also post your questions related to photography as a comment to this post, or in India Travel and Photography group discussion. I will answer them in next week’s article.
PHOTOGRAPHING MONSOONS
In my first few years of taking up photography seriously, monsoon season was the time to pack the camera and store it in the closet. The sky would be overcast through the season. It rained on and off, and I was at loss in thinking of opportunities for photography. At the end of the season when the rains subsided, I would invariably end up with fungus growing merrily in the unattended lenses. But over the next few years, I saw the joy in photographing even in rainy days. Here are some of my observations on getting the best from the camera in the wet season.
1. Keep the sky out
Overcast sky is not a great subject. More often than not the sky gets burnt and the details are lost. If that doesn’t happen, colours in rest of the image tend to appear dull. It is hard to get good exposure and quality images when sky becomes a part of the image in bad weather. Just keep the sky out of the frame and look for opportunities on the ground. This is the season when everything looks lush, alive and beautiful. Lookout for the smaller, interesting subjects than focusing on the grand landscapes. On a wet day, you will notice that the colours are rich and beautiful, and even mundane things can look pretty.
The image below is an example of how rich the colours can it get. The picture was taken on a day when it rained on and off and remained foggy through the day. You can see the fog behind the trees in the picture.
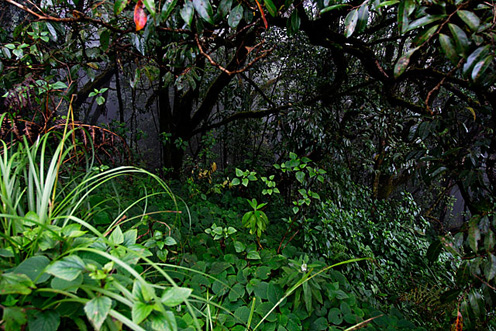
2. Capture the flow of water
This is the ideal time to photograph waterfalls and streams. Just head to the nearest forest and walk along a stream in search of your opportunities. Good pictures are not hard to come by if you are willing to spend a lot of time working on the compositions. It helps to carry a tripod to give a frozen look to the waterfalls (more about it in later chapters).

3. Walk into the fog
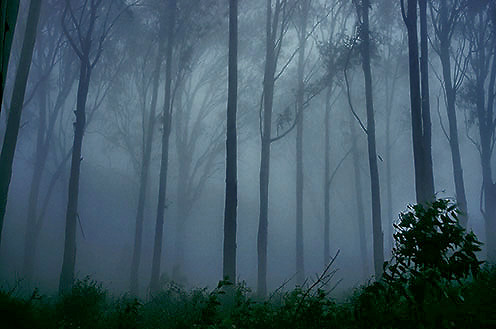
It took me a few years to realize that fog offers some great opportunities for photography. At a closer range, fog can be cleverly used to create some interesting images of shapes. Often it is the outline that matters in such weather, not the details. Get into a wooded place and look for interesting shapes and structures. See the example below.
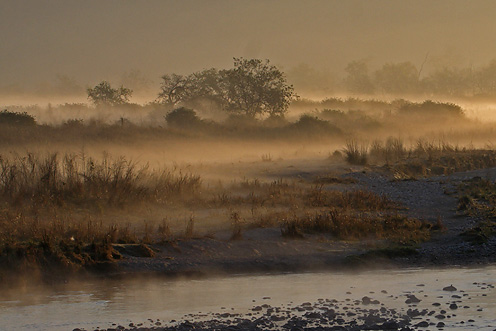
Sometimes, low lying fog can help make the landscape look surreal in the morning hours. Make sure you are up early in the morning and waiting at a vantage point to see (and photograph) such a beauty.
4. Look at people
This is not an area that I have spent time working on, but I have seen some beautiful images of celebrating the rains. Opportunities are many, like people looking up to the sky, wind harassing the umbrellas, little kids walking to school in raincoats,.. Life offers unlimited opportunities. Personally, I have found it difficult to capture people in the rains. Do you have any tips and experiences? Do share them in the comments section.
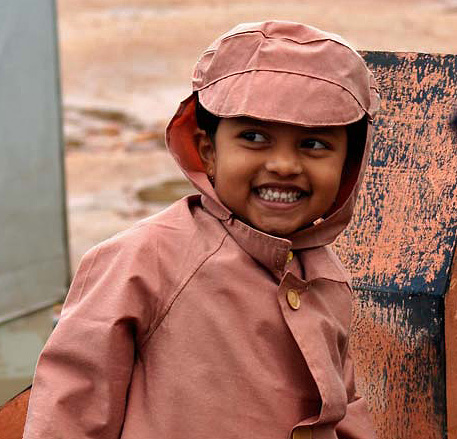
IMAGE REVIEWS
The image below is posted for review by flickr user JHarris2009

The moment is just right, and the timing of this photograph is perfect. The gentle bluish light around the performers on the floor works well. The picture is exposed properly, despite the possibility of getting an overexposed image in the dark background. One problem area I see is the shadows on the man’s face, especially on the eyes. Also, it looks like the image was shot from a side. It could have been bettered by shooting from a position in line with the performers.
If you would like to have your images reviewed to know what worked well and how it could have been improved, choose some of your best images, post them on group pool of India Travel and Photography and tag them as itpcritique. Only tagged images are taken for reviewing. You can also post your questions related to photography as a comment to this post or in India Travel and Photography group discussion. I will answer them in next week’s article.


